- Time Schedule/Itinerary
- Short Form Packing List
- Long Form Packing List
The "Times Schedule/Itinerary" template may be slightly confusing at first glance, so here are some screen caps and explanations to help reduce any uncertainties.
Here are two of the "official" itineraries I used during our trip last March. There is actually two separate templates, one of which was a slight modification of the other. I'll be providing both for you to use. As you can see, I'm a big fan of color coordinations, haha. I've found that it makes for easier planning.

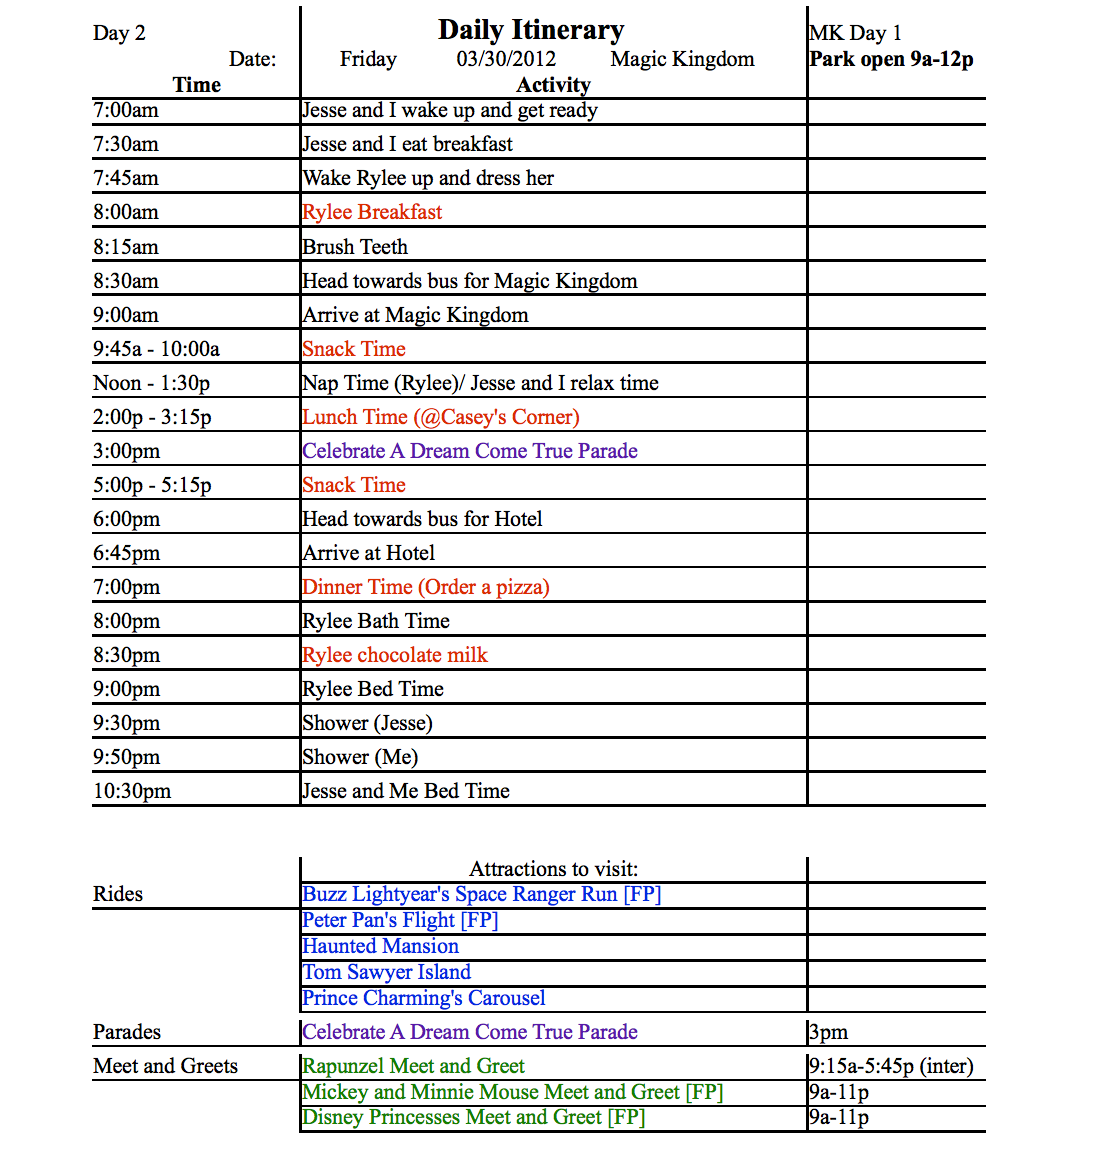
Now, the templates for you all to use (obviously) won't have all my writings in them, so let me explain what a couple of the elements found on them.
1. In this spot you see "Day 2" (in the templates you can use it will simply say "Day." You'll be able to add the number on your own). This spot is for the day of your vacation. If you're taking a five day vacation to the parks, and this is for your third day, then up in corner one it should say "Day 3."
2. Here you see "MK Day 1." This means that it was our first day at the Magic Kingdom. Use this spot if you're planning on going to the same park more than once. If you're only planning on visiting a park once, leave this space empty.
3. Spot three is for the date and the park you're visiting. The park is optional, especially if you're going more than once since you'll have it mentioned in the upper right corner, but for the parks you're only going to once, it might make it easier to have the park name mentioned.
4. Finally, spot four is where you can write in the times from which the park will be open. It's not necessary, but it's a helpful little snippet.
Next, is the bottom portion (Attractions to visit). I find this part to be helpful if you aren't sure exactly what to expect, or if you want a little bit more flexibility with your day. Over at the far right you'll see times, those are the times the attractions are open until. Rides go on until the end of the evening, but the parades and meet and greets don't, so I decided to put down the times during which they were available. If you choose to use this method, you may want to find out exactly when the character you want to see will be available (or next available, especially if the line for that character is long.)

Above I have provided you with both versions in color and in black and white. They are all editable to you guys. All you have to do is click on the area where you want to put information and type away! You can also choose to print them out and hand write on them if you prefer to do things that way. The way those work is:
1. Click on the link.
2. Click on a line where you want to write.
3. Type! (It's as simple as that!)
You can also choose to simply edit it in your web browser, or you can save it and work on it in your spare time. :)
(Side note: On the "Simple With Color" version at the very top of the activities area there is some writing. This is just a place holder to show where you can start typing and what goes in each area. This is also removable).
No comments:
Post a Comment